


Sunday, November 19, 2017
Extravaganza sale starts tomorrow!
Tomorrow, Monday, November 20th, the SU Extravaganza sale starts -- Select list of stamp sets are 20% off on Monday only, and a large list of other items are up to 50% off through the following Monday. It's going to be great! Shop online and use this hostess code. I will draw for a Mystery Hostess later in the month -- J3JK6K7F
Online Extravaganza
Thanks Everyone! and have a great Thanksgiving!
Beth
Here is a link to my website: bastamper.stampinup.net
Saturday, June 17, 2017
New stampin' stuff! -- colorful seasons and Beautiful Bouquet
The new annual catalog is here, and WOW! are there ever some amazing products in it! I love this time of year, when we get new stuff to play with!
My Open House is coming up next Friday, and these are the two free projects everyone gets to make.
First on my list of must haves, was the Colorful Seasons bundle. If you're looking for ONE set to make cards for ALL occasions, this is it! There is this awesome little branch die, with little pretty flowers to put on in for a spring time card, maple leaves in two sizes,with cut out ones to layer on top for fall or summer, and intricate, gorgeous snowflake dies for a winter card, PLUS!!! the cutest little beach chair die and beach chair stamp along with a little icy drink stamp, and even a tiny lemon stamp for your drink! Truly a must have bundle. For this card, I wanted to create a summer beach feeling, so I reached for another useful stamp set, High Tide stamp set, a set that carried over from the Occasions catalog.
Ok, here's a step by step on how to create this card. Start with a Whisper White panel -- 3 3/4 x 5". Start by sponging your sand first. Take some copy paper, and tear it in a jagged pattern. Put your torn edge of scratch paper about 1" from one of the short edges of your white panel. Sponge in a circular motion using Soft Suede ink. Make this layer of ink the darkest, as you want to give the impression of depth. When it's the shade you want, move your mask/torn copy paper down a little, moving your torn edge around to create a different looking layer of sand dunes -- sponge with soft Suede again. Move your mask a third time, making that third layer of sand. Now, decide where the edge of your "horizon" is going to be -- place the STRAIGHT edge of your copy paper mask here, and sponge towards your sand dunes using Bermuda Bay ink. Keep sponging, trying not to get too much blue into your sand. You want to create the look of a horizon, so make that edge by the straight part of your mask dark. Next, stamp the water from the High Tide stamp set in Bermuda Bay ink, taking care not to stamp it in your sand. Use more Bermuda Bay ink to sponge in the sky, making it lighter than your water. Stamp the grasses and birds from High Tide set in Old Olive and Early Espresso inks, respectively. The "Just Breathe" sentiment is from the Colorful Seasons stamp set. Finally, die cut that adorable beach chair out of Crumb Cake cardstock and add to the center of your sand and you're done! I used a tiny bit of chalk marker on my water to create the look of sun glistening off the water, as well as some clear wink of stella. Gotta add some shimmer and shine somewhere, right? :)


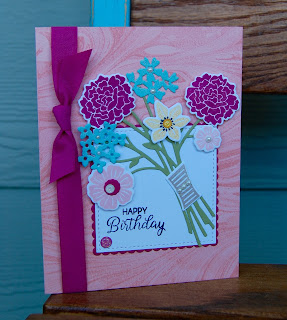
This second card features several new products as well. First, the new In Colors -- here I've combined the new Berry Burst and Powder Pink -- lovely combo! The Powder Pink calms down the brightness of the Berry Burst. There are two new background stamps that made my first order -- Marbled background and burlap background. I LOVE how the marble one looks when stamped! It is truly spectacular, and looks different than you would think it would. Adds a subtle, gorgeous look to your project. I used the largest stitched square die to die cut the white piece, and layered it onto a scalloped square cut from Berry Burst. The flowers are stamped in So Saffron, Berry Burst, and Powder Pink from the Beautiful Bouquet bundle, and die cut with the coordinating dies. I love the uniqueness of the dies that come with this set -- that bouquet of stems is so versatile. With one pass through your Big Shot, you have the base of your bouquet, and then you can just add whatever flowers you want. Those little die cut blue flowers here, were cut with other dies in the set -- from Pool Party card stock. I think these little dies would be gorgeous for a simple card featuring white or cream and black and crumb cake -- like for a wedding card. Can't wait to play with it some more. Two other new embellishments I used on this project, are the Berry Burst woven ribbon and the new Glitter Enamel dots. If you don't get any other embellishments from the catalog, you MUST get these dots! They are gorgeous, and each color fades out into white, so you can find a shade that will match almost any project you're working on! I think this gives you so much more bang for your buck, because you don't end up with half a package of your least liked colors, sitting around in your craft room forever -- just waiting for you to create a project in that color scheme you don't like!


Ok! that's it for today! Come to my Open House next Friday to see and play with LOTS of new products! There will be door prizes, chocolate, and lots of crafty inspiration -- not to mention, a big table of retired stuff marked down to 50% off it's original price!!!!!

My Open House is coming up next Friday, and these are the two free projects everyone gets to make.
First on my list of must haves, was the Colorful Seasons bundle. If you're looking for ONE set to make cards for ALL occasions, this is it! There is this awesome little branch die, with little pretty flowers to put on in for a spring time card, maple leaves in two sizes,with cut out ones to layer on top for fall or summer, and intricate, gorgeous snowflake dies for a winter card, PLUS!!! the cutest little beach chair die and beach chair stamp along with a little icy drink stamp, and even a tiny lemon stamp for your drink! Truly a must have bundle. For this card, I wanted to create a summer beach feeling, so I reached for another useful stamp set, High Tide stamp set, a set that carried over from the Occasions catalog.
Ok, here's a step by step on how to create this card. Start with a Whisper White panel -- 3 3/4 x 5". Start by sponging your sand first. Take some copy paper, and tear it in a jagged pattern. Put your torn edge of scratch paper about 1" from one of the short edges of your white panel. Sponge in a circular motion using Soft Suede ink. Make this layer of ink the darkest, as you want to give the impression of depth. When it's the shade you want, move your mask/torn copy paper down a little, moving your torn edge around to create a different looking layer of sand dunes -- sponge with soft Suede again. Move your mask a third time, making that third layer of sand. Now, decide where the edge of your "horizon" is going to be -- place the STRAIGHT edge of your copy paper mask here, and sponge towards your sand dunes using Bermuda Bay ink. Keep sponging, trying not to get too much blue into your sand. You want to create the look of a horizon, so make that edge by the straight part of your mask dark. Next, stamp the water from the High Tide stamp set in Bermuda Bay ink, taking care not to stamp it in your sand. Use more Bermuda Bay ink to sponge in the sky, making it lighter than your water. Stamp the grasses and birds from High Tide set in Old Olive and Early Espresso inks, respectively. The "Just Breathe" sentiment is from the Colorful Seasons stamp set. Finally, die cut that adorable beach chair out of Crumb Cake cardstock and add to the center of your sand and you're done! I used a tiny bit of chalk marker on my water to create the look of sun glistening off the water, as well as some clear wink of stella. Gotta add some shimmer and shine somewhere, right? :)


This second card features several new products as well. First, the new In Colors -- here I've combined the new Berry Burst and Powder Pink -- lovely combo! The Powder Pink calms down the brightness of the Berry Burst. There are two new background stamps that made my first order -- Marbled background and burlap background. I LOVE how the marble one looks when stamped! It is truly spectacular, and looks different than you would think it would. Adds a subtle, gorgeous look to your project. I used the largest stitched square die to die cut the white piece, and layered it onto a scalloped square cut from Berry Burst. The flowers are stamped in So Saffron, Berry Burst, and Powder Pink from the Beautiful Bouquet bundle, and die cut with the coordinating dies. I love the uniqueness of the dies that come with this set -- that bouquet of stems is so versatile. With one pass through your Big Shot, you have the base of your bouquet, and then you can just add whatever flowers you want. Those little die cut blue flowers here, were cut with other dies in the set -- from Pool Party card stock. I think these little dies would be gorgeous for a simple card featuring white or cream and black and crumb cake -- like for a wedding card. Can't wait to play with it some more. Two other new embellishments I used on this project, are the Berry Burst woven ribbon and the new Glitter Enamel dots. If you don't get any other embellishments from the catalog, you MUST get these dots! They are gorgeous, and each color fades out into white, so you can find a shade that will match almost any project you're working on! I think this gives you so much more bang for your buck, because you don't end up with half a package of your least liked colors, sitting around in your craft room forever -- just waiting for you to create a project in that color scheme you don't like!


Ok! that's it for today! Come to my Open House next Friday to see and play with LOTS of new products! There will be door prizes, chocolate, and lots of crafty inspiration -- not to mention, a big table of retired stuff marked down to 50% off it's original price!!!!!
Saturday, March 25, 2017
Hey, Chick! Have a Happy Day!
Happy Saturday!
I wanted to share a couple of cards featuring Sale-a-bration freebies, since SAB is almost over -- ends on March 31st. Get them before they're gone! Free product with every $50 order, AND SU just added a few new things to the line up this week.
Two of THE most popular Sale-a-brations sets, have been "Hey Chick" and "Delicate Details". I just LOVE the chicken with the messy hair. She just makes me laugh! For this card, we used the new Watercolor pencils with watercolor paper, and either Blender Pens or an Aqua Painter to color them in -- so folks could try out both options to see which one they liked best. The chicken wire background, was made by inking up the inside of the hexagon embossing folder, and using it as a "stamp" to create the background. Colors used: card stock -- Heavy weight white, water color paper, Crumb Cake, Espresso. Ink: Early Espresso and water color pencils. Also featured: stitched dies, layering circle dies, classic label punch, and the Metallic Enamel shapes.


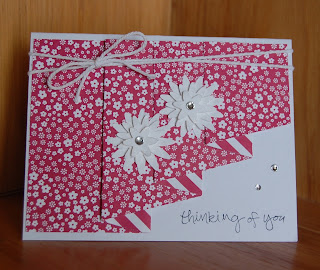
This card features the Delicate Details set. I layered three of the stamps on a block, using my grid paper to make sure the stamps were straight. We then stamped them in Versamark and embossed them with white embossing powder. Of course, we sponged some Espresso ink on the edges of the panel to create more of a vintage look. Folks could choose to make either the chicken card or this card -- two different Sale-a-bration sets with completely different looks -- one cutesy/funny, and one elegant. Those little wood hearts, are from the sending love embellishments and the little flower embellishments are the Falling in Love embellishments -- by far my favorite product from the Occasions catalog -- elegant, intricate, and beautiful! These detailed border stamps also work perfectly for the edging on a note card. Super simple, but so stunning! Pair them with the "So Very Much" SAB set, and you have easy peasy, gorgeous thank you notes!


 Ok! that's it for today! Off to enjoy a day with my family! Maybe the first bike ride of the season, or swimming, or skiing, or bacon and eggs!
Have a Happy Day!!!!
I wanted to share a couple of cards featuring Sale-a-bration freebies, since SAB is almost over -- ends on March 31st. Get them before they're gone! Free product with every $50 order, AND SU just added a few new things to the line up this week.
Two of THE most popular Sale-a-brations sets, have been "Hey Chick" and "Delicate Details". I just LOVE the chicken with the messy hair. She just makes me laugh! For this card, we used the new Watercolor pencils with watercolor paper, and either Blender Pens or an Aqua Painter to color them in -- so folks could try out both options to see which one they liked best. The chicken wire background, was made by inking up the inside of the hexagon embossing folder, and using it as a "stamp" to create the background. Colors used: card stock -- Heavy weight white, water color paper, Crumb Cake, Espresso. Ink: Early Espresso and water color pencils. Also featured: stitched dies, layering circle dies, classic label punch, and the Metallic Enamel shapes.


This card features the Delicate Details set. I layered three of the stamps on a block, using my grid paper to make sure the stamps were straight. We then stamped them in Versamark and embossed them with white embossing powder. Of course, we sponged some Espresso ink on the edges of the panel to create more of a vintage look. Folks could choose to make either the chicken card or this card -- two different Sale-a-bration sets with completely different looks -- one cutesy/funny, and one elegant. Those little wood hearts, are from the sending love embellishments and the little flower embellishments are the Falling in Love embellishments -- by far my favorite product from the Occasions catalog -- elegant, intricate, and beautiful! These detailed border stamps also work perfectly for the edging on a note card. Super simple, but so stunning! Pair them with the "So Very Much" SAB set, and you have easy peasy, gorgeous thank you notes!


Have a Happy Day!!!!
Saturday, March 4, 2017
All Occasions Card Class
Happy Saturday, Stampers and Scrappers!
Yep! I'm once again posting to my long neglected blog. AND, I have some cute cards to share with you from my recent All Occasions card buffet class. Here is the lineup:
 This first card features the Drapery Fold technique, and the card design is one I saw on Lyssa's blog and loved. To learn the dimensions for scoring your designer paper, see this link. We used the Regals Paper stack for the DSP on these.


This cute card features a free Sale-a-bration stamp set called "Tasty Trucks". It is the cutest set that you can add cupcakes, ice cream, or tacos to, to make it a custom truck -- with adorable sayings to go with. We used the new water color pencils and blender pens to color in the truck.


 I called this card "Washi Tape Madness". I have collected way too much washi tape over the years, and am determined not to buy any more until I have used some of my collection up! Ha ha! For this card, we simply took a Whisper white panel and added our strips of washi tape, and then die cut the circle with the layering circle framelits. That cute little scalloped border at the bottom, is made using the top edge of the best badge punch.


 This card was inspired by a card SU posted with the new Glitter paper selection that was added to the Sale-a-bration freebies. I didn't have any of that yet, so I used the Blushing Bride Glitter paper. This card features the Stylish Stems thinlet dies. I die cut the two flowers out of my white front panel, and then put two squares of the glitter paper behind the die cut outs. Those little leaves are from the same die set -- I lined up all four leaf designs on my Big Shot plate and ran them through. Some Blushing Bride sequins and retired ribbon that I had added that final pretty touch.
 The Paisleys and Posies stamp set carried over from the Holiday catalog last year, and I hadn't had a chance to play with it much. This is a super simple card using just the stamps, but the coordinating dies are also beautiful! Colors used here are: Blackberry Bliss (retired), Mint Macaron, and Sweet Sugarplum.

 This "High Tide" stamp set from the Occasions catalog, is one of my favorite new sets. You can stamp it simply, or go all out with this set. Colors used: Smokey Slate, Dapper Denim, Whisper White, Old Olive, Crumb Cake, and Memento Black.
 This Heartfelt Sympathy stamp set had not seen ink even once, so I had to use this set! I had some retired Baked Brown sugar card stock, which I used for the base, and combined it with Soft Suede and Very Vanilla. The swirls are stamped with the Falling Flowers stamp set -- another set I haven't used enough. That gorgeous little embellishment on the front, is from the Occasions catalog -- Falling in Love embellshments. I LOVE these! They are so elegant, and add that perfect touch to this card!

 This Mickey and Minnie idea, is from Pinterest, so can't take ANY credit for this design. I thought it showed a brilliant way to use the swirly scribbles thinlet dies. We used the bow builder punch for the bow.


 The "Beautiful You" stamp set caught my eye the first time I looked at the Occasions Catalog. It has so many lovely sentiments in addition to the pretty lady. We used gold and clear wink of stella to color in her dress and hat. The lacy look, is another die set I love! -- the So Detailed thinlet dies. It cuts so easily, even though it is so intricate. LOVE that! Colors used: Basic Black, Sahara Sand, Very Vanilla.

 Last, but not least, this thank you card features two free Sale-a-bration stamp sets -- Delicate Details, for the lacy border on the bottom, and the So Very Much set that has that gorgeous thank you sentiment. We stamped the Delicate details border in Early Espresso, and then stamped the Thank You in versa mark, and embossed it with copper embossing powder. It looks so elegant in real life, and yet not hard to create.
 Ok! that's it for today! Sabina and I are having a "girls' weekend", as Daddy and brother are off to a jiu jitsu tournament! We have play dates planned, and maybe a chocolate cake???
Don't forget to check out the Sale-a-bration freebies you can get for FREE with a $50 through the end of March! There are some beauties this year!
Yep! I'm once again posting to my long neglected blog. AND, I have some cute cards to share with you from my recent All Occasions card buffet class. Here is the lineup:


This cute card features a free Sale-a-bration stamp set called "Tasty Trucks". It is the cutest set that you can add cupcakes, ice cream, or tacos to, to make it a custom truck -- with adorable sayings to go with. We used the new water color pencils and blender pens to color in the truck.


Don't forget to check out the Sale-a-bration freebies you can get for FREE with a $50 through the end of March! There are some beauties this year!
Wednesday, February 8, 2017
Sunburst technique -- trial and error!
Happy Wednesday, friends!
I saw this link on Pinterest, for a Sunburst layout, and was so excited to try it. Well, all I can say, is that mine didn't look quite like theirs does, SO,..... I did my own thing and came up with my own template which seemed easier to me. Inspiration always starts somewhere, though, right?!!!
With this layout, you'll just have to do as I SAY, not as I DID, ok? I promise, it WILL work out better that way.
Here is my layout and then I will explain what NOT to do, and show you a template of how your pieces should go together.
 As you can see, the pieces between the right and left pages don't line up in the middle. This is bothering my Type A-ness EXCEEDINGLY much -- but not enough to waste a bunch of paper to re-do it... Instead, I'll just show you how NOT to re-create my mistake.
So, first, these are the measurements I used for my designer paper strips. Cut each rectangular strip diagonally to create two triangular pieces. The designer paper I'm using here, is the Floral Boutique DSP from the main SU catalog. It is such gorgeous paper -- one of the few packs where I like every single sheet! Also used on this layout, are the new succulent framelit dies to create those beautiful little flowers. See! these dies can make flowers as well as succulents! The title piece is cut with the new stitched framelit dies, layered on a scalloped oval from the layering ovals dies.
Ok, here are the measurements you'll need if you decide to embark on this journey yourself!
(2) 12x4" pieces -- here these are cut from navy card stock
(5) 8x4" pieces
(4) 6x4 pieces -- one of these is also cut from the navy card stock
Start with your left hand page, and mark the center point at the bottom of your page -- i.e. 6" in.
Use one of your 12x4" pieces, and line it up with the end point pointing at that 6" mark you made at the bottom of your page. You will then build your layout around this triangle, leaving about 1/8" in between each triangle. See my template below to see which sized pieces go where -- I have labeled each piece with the dimensions on it, so you can easily fit your "puzzle" together. You will get a big messy mess of points in the middle, but don't worry, be happy! you can trim them off and cover them up with your photo mats!


 Ok! Now you're ready for the right hand page, AND to avoid the mistake that I made! You will create this page as a mirror image of the left page. Start by trimming off your excess paper from the right hand edge of your left scrap page.
 Now, do the same thing -- mark the middle of your right scrap page at the center point at the bottom -- 6" mark. Grab your 12x4" triangle, and line the edge of it up with it's sister on the left hand page, with the point pointing towards that 6" mark -- see the photos below. Add your next strips, lining each of them up with it's coordinating one on the left page.


When you trim off all your points, this is how the papers SHOULD line up -- unlike the layout I did.

For the layout I did, I used triangular scraps that I had trimmed off the edges to fill in the bottom of the page, but for the template I created, I used a single 6x4" triangular piece (cut from Navy Card Stock) to fit into that little niche at the bottom of the pages.


 Don't forget! It's Sale-a-bration time! Get a FREE product with every $50 purchase. AND, there are 3 NEW freebies coming out on Feb 21st. More details coming soon -- my favorite new upcoming product, is a 6x6 stack of glimmer paper in NEW colors! Ooooh la la! AND a beautiful Medallion stamp set.
I saw this link on Pinterest, for a Sunburst layout, and was so excited to try it. Well, all I can say, is that mine didn't look quite like theirs does, SO,..... I did my own thing and came up with my own template which seemed easier to me. Inspiration always starts somewhere, though, right?!!!
With this layout, you'll just have to do as I SAY, not as I DID, ok? I promise, it WILL work out better that way.
Here is my layout and then I will explain what NOT to do, and show you a template of how your pieces should go together.

So, first, these are the measurements I used for my designer paper strips. Cut each rectangular strip diagonally to create two triangular pieces. The designer paper I'm using here, is the Floral Boutique DSP from the main SU catalog. It is such gorgeous paper -- one of the few packs where I like every single sheet! Also used on this layout, are the new succulent framelit dies to create those beautiful little flowers. See! these dies can make flowers as well as succulents! The title piece is cut with the new stitched framelit dies, layered on a scalloped oval from the layering ovals dies.
Ok, here are the measurements you'll need if you decide to embark on this journey yourself!
(2) 12x4" pieces -- here these are cut from navy card stock
(5) 8x4" pieces
(4) 6x4 pieces -- one of these is also cut from the navy card stock
Start with your left hand page, and mark the center point at the bottom of your page -- i.e. 6" in.
Use one of your 12x4" pieces, and line it up with the end point pointing at that 6" mark you made at the bottom of your page. You will then build your layout around this triangle, leaving about 1/8" in between each triangle. See my template below to see which sized pieces go where -- I have labeled each piece with the dimensions on it, so you can easily fit your "puzzle" together. You will get a big messy mess of points in the middle, but don't worry, be happy! you can trim them off and cover them up with your photo mats!


When you trim off all your points, this is how the papers SHOULD line up -- unlike the layout I did.


Subscribe to:
Posts (Atom)


