Friday, April 29, 2011

Sneak Peek into Summer!


There's a new stamp set coming out in the new Summer Mini called "Fabulous Florets" -- and it is indeed fabulous!  There is also new embossing powders in Wild Wasabi, Melon Mambo, and Tangerine Tango -- so the stems on these roses are embossed with the WW embossing powder.  I then stamped the roses in Versamark on Shimmery White cardstock, painted them with an aqua painter and my Melon Mambo ink pad, then cut them out.  Finally, I used the new embossing folder -- "Flower Garden" for the card base.  These are all products from the upcoming Summer Mini catalog -- coming out May 1st.  Can't wait for some more time to play with these fun new products.

Happy Stamping!!!


Wednesday, April 27, 2011

Water colored Medallion


Going for the water colored muted look, here.  I took the Medallion background stamp, applied Marina Mist ink to parts of the stamp, then Rich Razzleberry to the un-inked section -- spritzed liberally with water, and stamped on a water color paper panel.  I then used the color spritzer tool with a Rich Razzleberry marker to add some "speckles" to the paper.

Here is the same card done in Pumpkin Pie and Cherry Cobbler.  Love these rich, striking colors.  I used the Early Esspresso marker with the color spritzer tool on this card.

Happy Stamping!


Safari themed custom order

Another etsy request for some custom letters to match a Safari theme.  I think they turned out really cute!  Used some retired SU designer papers, corduroy buttons, and stamped the little giraffe (from "Wild About You") and the little mommy/baby elephant in Chocolate craft ink and embossed with clear embossing powder.  Enjoy!


Tuesday, April 19, 2011

Happy Easter!


Happy Almost Easter!  I've been playing around with the "embossed frame" technique some more.  (You can see details of how to do this technique in a previous post.)  This time I made a reverse mask -- i.e. cut a 3" circle (the same size as the chipboard frame), out of a piece of scratch paper -- laid that over the embossed frame, and sponged ink around the edges to make the edges of the frame stand out.  Once again, I've used the "Easter Blossoms" stamp set from the Occasions Mini catalog.  I sooo love this set -- and hope very much it will be in the new big catalog in July.  Pretty Please!!!

I also used the new "sneak peak" set -- "Four Frames" -- that is available to purchase during the month of April -- see the promotion on the sidebar of my blog.  I always have to buy any set that matches a punch, because,.... I HATE to cut stuff out by hand!  -- and, the Decorative Label punch is one of my faves, so this set was an absolute for me! :)

The colors used in this design, is Early Espresso, Whisper White, and Marina Mist.  Not your traditional Easter colors, but I liked how these colors work together.

Happy Stamping!

Monday, April 18, 2011

A bit of spring, with a slightly modern feel

Here is the final project we will be making at my upcoming Mother's Day class.  It show cases the stamp set, "Vintage Vogue".  I only used two colors of ink here -- Rose Red and Certainly Celery.  Stamp the large flower once, and then a second time to create a two-tone look.  For the centers of the big flowers, I used a little flower punch from the Itty Bitty Punch pack.  For the small flowers, I colored some rhinestones black with my faithful black Sharpie marker!  Makes the perfect embellishment for the centers of these little flowers.

Supplies list:
Card stock: Rose Red, Whisper White, Basic Black
Ink: Rose Red, Certainly Celery, Basic Black
Stamps: Vintage Vogue, Oval All
Accessories: Big Shot, Finial Press embossing folder, Scallop #2 die, clear circle die, large oval and scallop oval punches
Retired Certainly Celery ribbon

Happy Stamping!


Butterflies Mother's Day card

Here is a simple Mother's Day card using the "Flight of the Butterfly" stamp set.  This is a card we will be making at my upcoming class on May 7th.  The colors are Chocolate Chip and Bashful Blue.  Of course, I cut the Top Note die out of Whisper White cardstock, and sponged the edges with chocolate chip to soften the image a bit.

The polka dotted butterfly adds a bit of dimension -- just stamp it on Vellum card stock, then punch it out with the butterfly punch and adhere to the card -- complete with some little pearls for it's body!

The ribbon and designer paper used here, are retired, but the rest of the supplies are current.

Happy Crafting!

Stamped Candle

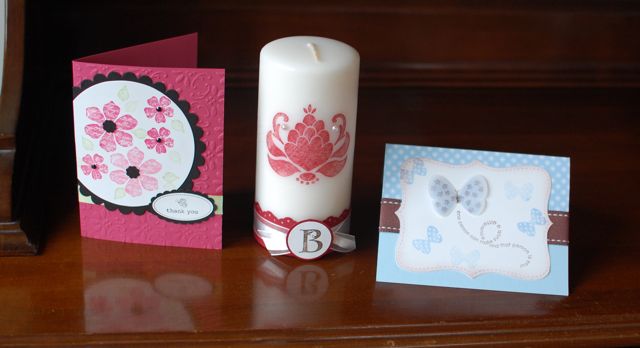
Simple, yet stunning, project!  We will be making this at my next class -- the Mother's Day Paper crafting/School Fundraiser class at West Valley School.

To make this, start out by stamping the Ornate Blossom stamp in Cherry Cobbler ink on white gift wrapping tissue.
Trim around image
Lay image on candle in the location you want it to be
Take a sheet of waxed paper -- large enough to wrap to the back of the candle with room to grab the "tails" firmly in your hand on the back side of the candle
Make sure there are no wrinkles in the waxed paper covering the image, and that it is holding the image firmly in place.
Heat image with heat gun until you start to see it melting into the candle -- it will go from looking white and tissue paper like, to more shiny and darker in color
Continue heating until entire image is melted into the candle.
Peel away the waxed paper and embellish image with Pearl accents.

To make the bottom look more decorative, I punched the edge of a 1 1/2 x 8 1/2" strip of Cherry Cobbler card stock, and adhered it around the candle with Mono Multi glue -- the stuff with the green lid, making sure my "seam" was in the back.  I then tied a sash of white organy ribbon around, and embellished it with a monogram letter -- from the "Lovely Letters" alphabet.  Put it in a pretty little organza bag, and Ooh La La! what a lovely gift for your mom this Mother's Day!

Mother's Day Paper Crafting Class/School Fundraiser

Join us at West Valley School on Saturday, May 7th, at 10 am to make these three beautiful projects -- the perfect Mother's Day gift ensemble!  All proceeds, including the $15 class fee, will be donated to the West Valley School PTO.  See all the details on my Events Calendar.

I will post the details separately for each of these projects.

Thanks for stopping by!

Tuesday, April 12, 2011

Journals Extraordinair!

Here are some of the beautiful journals created at my chipboard journals class several weeks ago.  This first journal, was made by a 10 year old -- didn't she do a fantastic job???  She was so very proud of her creation -- a gift for her teacher.  Of course, she used the Blossom Petals punch and Build a Blossom stamp set to make that stunning flower for the front.

A sixteen year old girl made this one.  She wanted lots of color, textures, and her own flair.  I think she accomplished her goal!:)
This journal was created as a baby shower gift.  I liked the modern/artsy feeling she created -- as opposed to the traditional "baby boy blue".  What a unique gift for the mother-to-be -- a one of a kind baby book!


Wednesday, April 6, 2011

Embossed Frame Cherry Blossoms

I've been wanting to try this technique for a while now, where you make an embossed frame to stamp in.  And,... here's how you do it!  Take a pc of heavy weight SU chipboard, about 5 3/4 x 4 1/4", and cut a 3" circle out of the center using the new 3" circle Bigz die.  Now, for the Big Shot "sandwich", this is how you do it -- from bottom to top:

Platform on Tab 2 (i.e. no tabs extended)
embossing folder with cardstock inside it
 chipboard frame centered over top of embossing folder
cutting pad on top

The sandwich may be a little tight, but should go through just fine.  I then stamped the cherry blossom sprigs from the Easter Blossoms stamp set in Basic Black, and colored them in with the water color crayons and aqua painters.  To make the frame stand out more, I sponged it with crumb cake ink and then used a sponge dauber to apply White Frost shimmer paint.  In real life, it is a shiny pearly frame.  Added a little croquet trim to finish off the Vintage look.

Hope you'll feel inspired to try this yourself!  My next idea is to do some reverse masking to make the embossed frame stand out even more.  Next time! :)

Happy crafting!