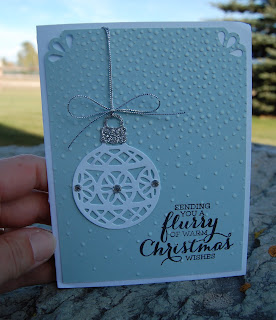
For this first card, we are using the new Delicate Ornaments thinlet dies to make that beautiful ornament. Such a simple card, but has some class I think. Of course, it is helpful to stamp the sentiment FIRST, and then emboss the Soft Sky panel with the Softly falling embossing folder. I then added some white craft ink to the embossed dots to look like snow.
Here is a less traditional card, using Crumb Cake, Cherry Cobbler, and Very Vanilla. Featured on this cards is the Holly Jolly Greetings bundle, that comes with the word stamps that coordinate with the die cut words -- jolly, merry, and peace. Love this set. the little wood snowflake elements add so much to a Christmas card -- here, I used a sponge dauber with Cherry Cobbler ink and added some ink to the snowflake to make it pop. So easy to do, but changes the look of the snowflake!
The Flurry of Wishes bundle features these beautiful snow flakes that have a matching punch, that punches out two snowflakes at once. The medium sized snowflake in this set, coordinates with the flower medallion punch. I like the elegant style of these flakes. Again, I used a sponge dauber dipped in Island Indigo ink to color the wood snowflake blue. I then added Dazzling Details to the snowflake to make it glitter! Oh, how I love sparkle!
This is my favorite card -- inspired by some I saw on Pinterest. This is again a non-traditional color scheme. You start with a white panel -- stamp the trees from the Winter Wonderland set in Memento black ink. I stamped once, and then again without re-inking to give that look of some trees being in the background shrouded in mist. Next, I used a sponge in Marina Mist ink and added blue ink towards the base of the trees, then Wisteria Wonder ink above that with that color fading out towards the top. I then added white "snow" to the branches with the white chalk marker. Once the card was fully assembled, I scribbled some Dazzling Details onto the entire trees to further make them "pop". A little strip of silver glimmer paper at the bottom, and a Winter Wonderland embellishment finishes the card!
This little penguin card is a total CASE of one I saw on Pinterest, so I can't take any credit for this one. I thought the igloo was so incredibly cute, that I just had to share. It is one of the oval framelits cut in half. Then use the large oval punch to punch out the 'door'. This little penguin is from the Snow Place bundle -- THE cutest snow people you've ever seen! and a framelit to cut out each little accessory. If you love all things snowmen, you will LOVE this set. Sabina was especially excited to get this set. :) To make the oval look like an igloo, simply emboss it with the brick wall embossing folder, then sponge with ink -- here I used Coastal Cabana, a retired color. Of course, I had to have some glittery snow. :) So I used a 4 x 2" piece of the Dazzling Diamonds glimmer paper -- simply cut it in a curvy line and that gives you two snow banks to use on cards.
Ok! That's it for today! Happy Sunday to each of you and may you get your stampin' ON!


